 AppFlightBETA
Install & setup
- Open the DMG and drag AppFlight to Applications.
- Open the app. It’s signed and notarized by Apple, so macOS opens it without a warning.
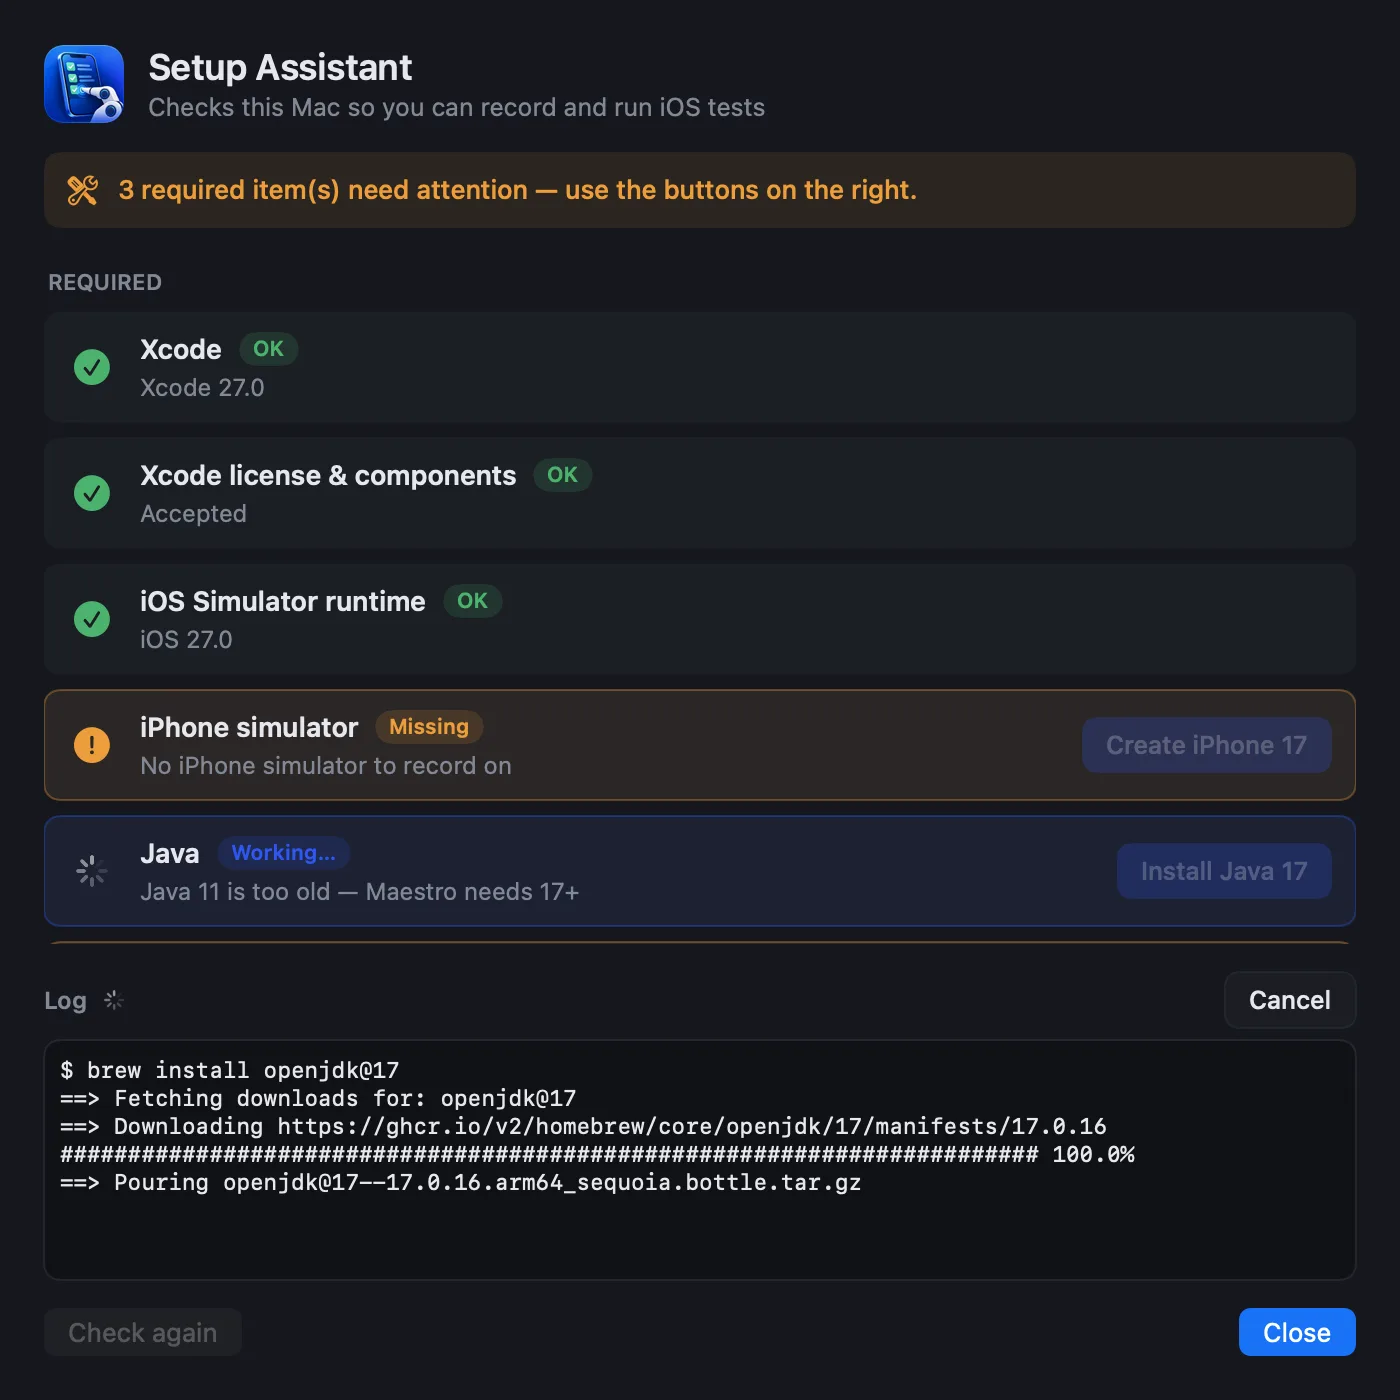
- The Setup Assistant opens by itself when something is missing. Each row shows OK / Missing and has a one-click fix: Xcode, the license, the iOS Simulator runtime (~8 GB), an iPhone simulator, Java 17+ and Maestro. AXe is bundled.
- Choose your app under test: a Simulator build (
.app), or an app already installed on the simulator.
Settings → General → Language switches the whole app between English and Vietnamese, live.
Cài đặt & thiết lập
- Mở file DMG và kéo AppFlight vào Applications.
- Mở app. App đã được ký và notarize bởi Apple nên macOS mở luôn, không cảnh báo.
- Setup Assistant tự mở khi thiếu thứ gì đó. Mỗi dòng báo OK / Missing kèm nút sửa một chạm: Xcode, license, iOS Simulator runtime (~8 GB), máy ảo iPhone, Java 17+ và Maestro. AXe có sẵn trong app.
- Chọn app cần test: bản build cho Simulator (
.app) hoặc app đã cài trên máy ảo.
Settings → General → Language để chuyển toàn bộ app giữa tiếng Anh và tiếng Việt, đổi ngay không cần mở lại.
Record your first test
- Boot a simulator in the Devices column (or pick one that is already booted).
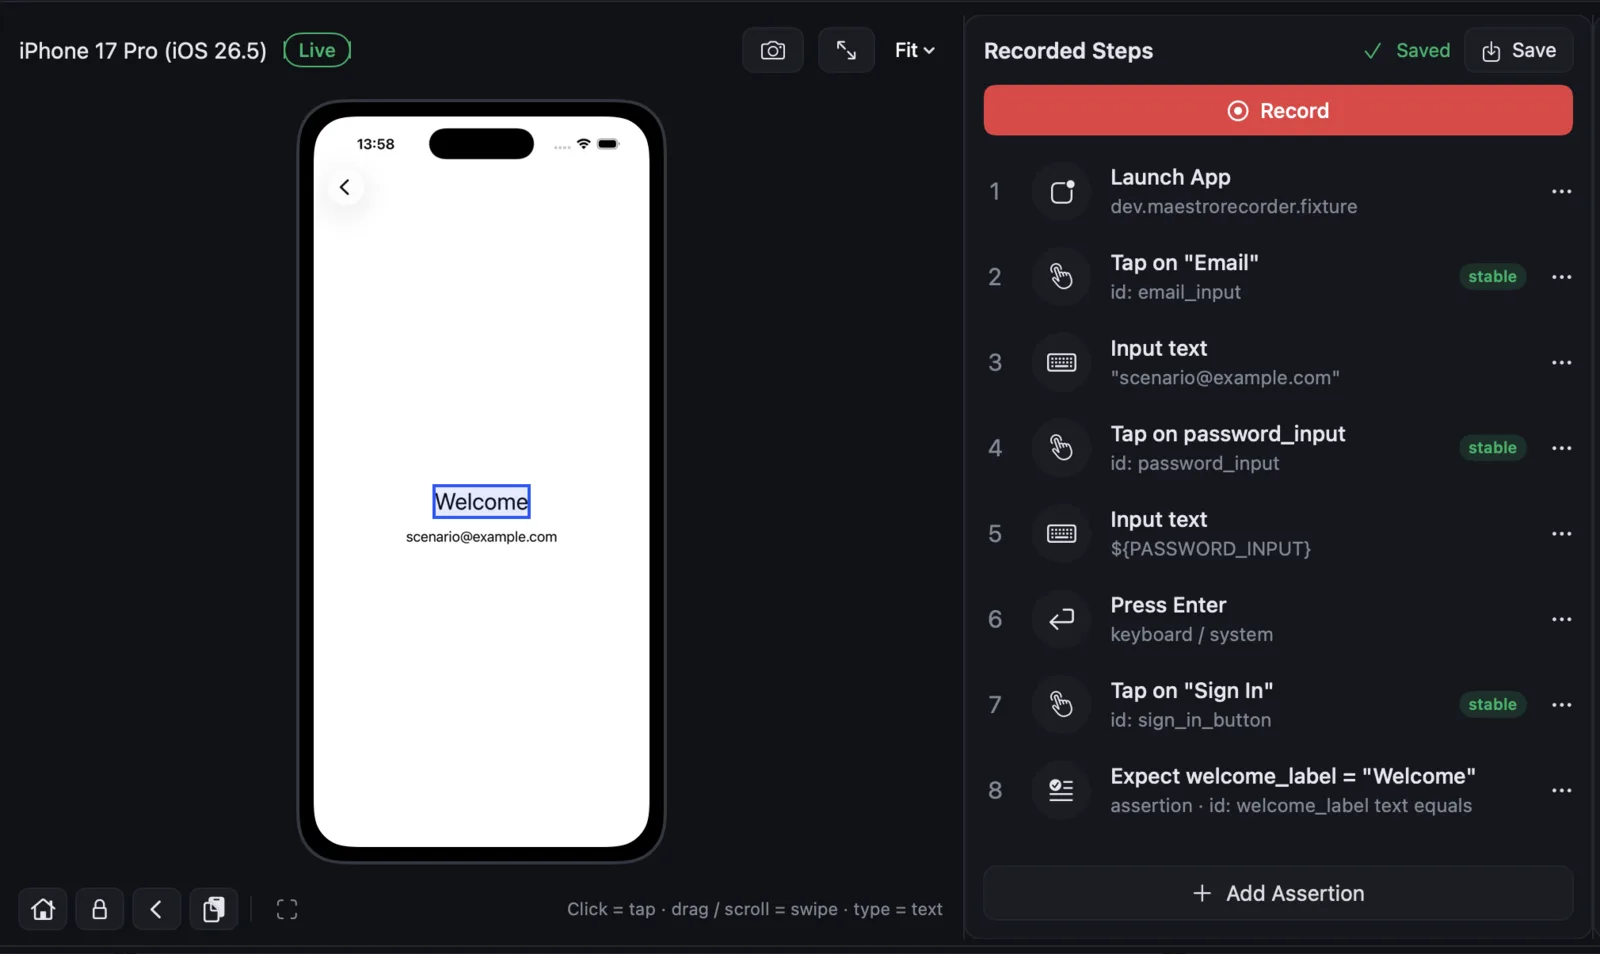
- Press Record ⇧⌘R and use the app in the preview: click to tap, drag to swipe, type on your keyboard. Password fields become
${VARIABLES}automatically. - Press Stop. Review the steps; double-click one to edit its selector or value.
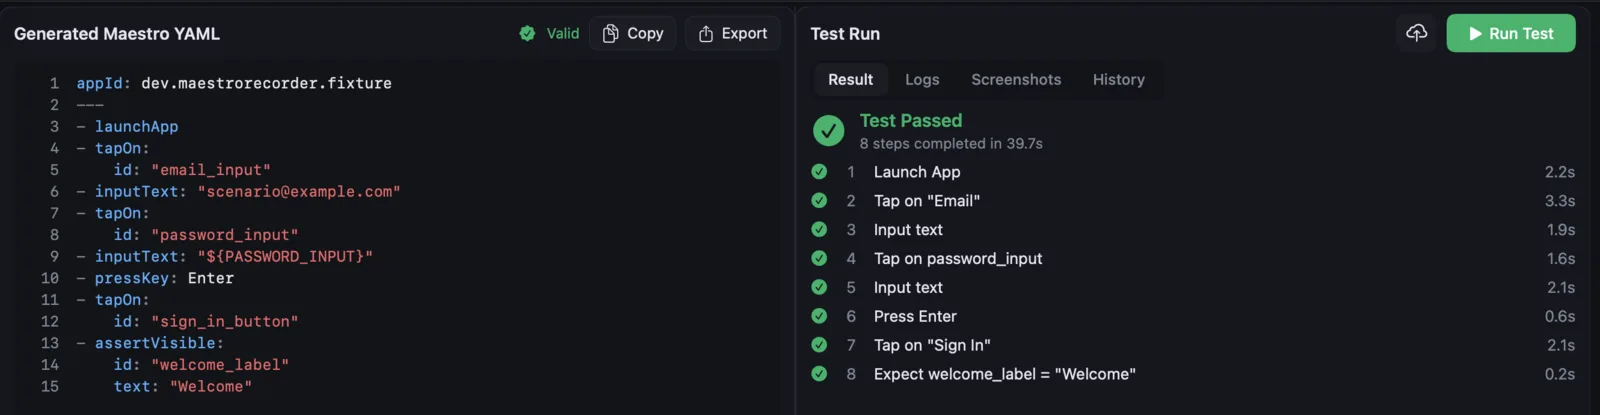
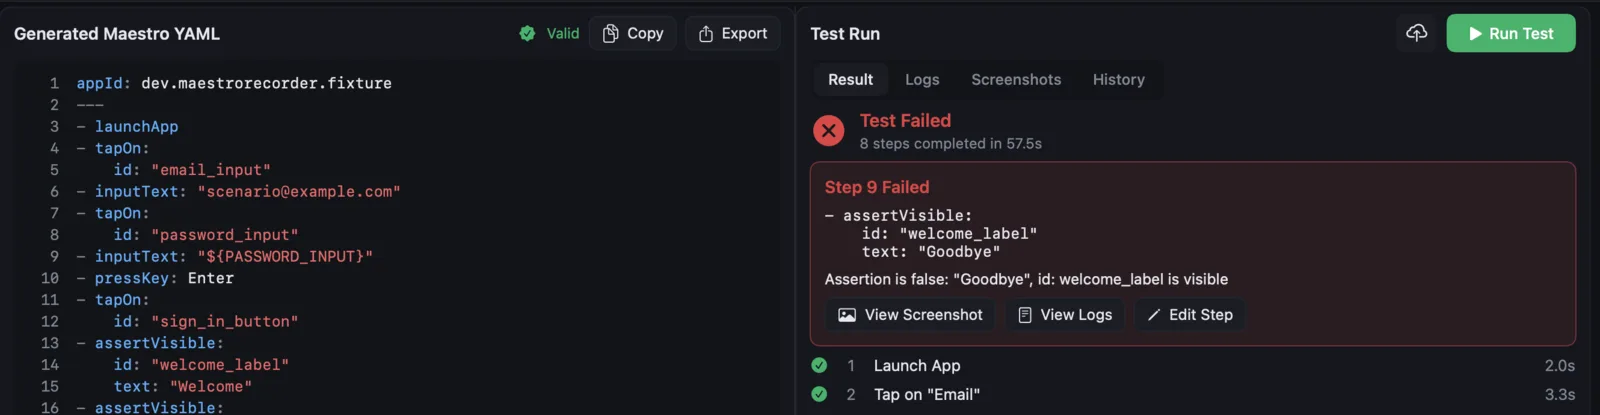
- Press Run ⌘R. The running step is highlighted and every step turns ✓ or ✗. A failure card shows the failing step with a screenshot and logs.
Tests save automatically and appear in the sidebar. This is the YAML a short login recording produces:
Ghi bài test đầu tiên
- Bật một máy ảo ở cột Devices (hoặc chọn máy đang chạy sẵn).
- Bấm Record ⇧⌘R rồi dùng app trên màn hình xem trước: bấm chuột để chạm, kéo để vuốt, gõ bằng bàn phím. Ô mật khẩu tự thành
${BIẾN}. - Bấm Stop. Xem lại các bước; nhấp đúp một bước để sửa selector hoặc giá trị.
- Bấm Run ⌘R. Bước đang chạy được tô sáng, mỗi bước chuyển ✓ hoặc ✗. Thẻ lỗi hiện bước bị lỗi kèm ảnh chụp và log.
Test tự lưu và hiện ở thanh bên. Đây là YAML của một lần ghi đăng nhập ngắn:
appId: com.example.app
---
- launchApp
- tapOn:
    id: "email_input"
- inputText: ${EMAIL}
- tapOn: "Sign in"
- assertVisible: "Home"
Add checks and logic
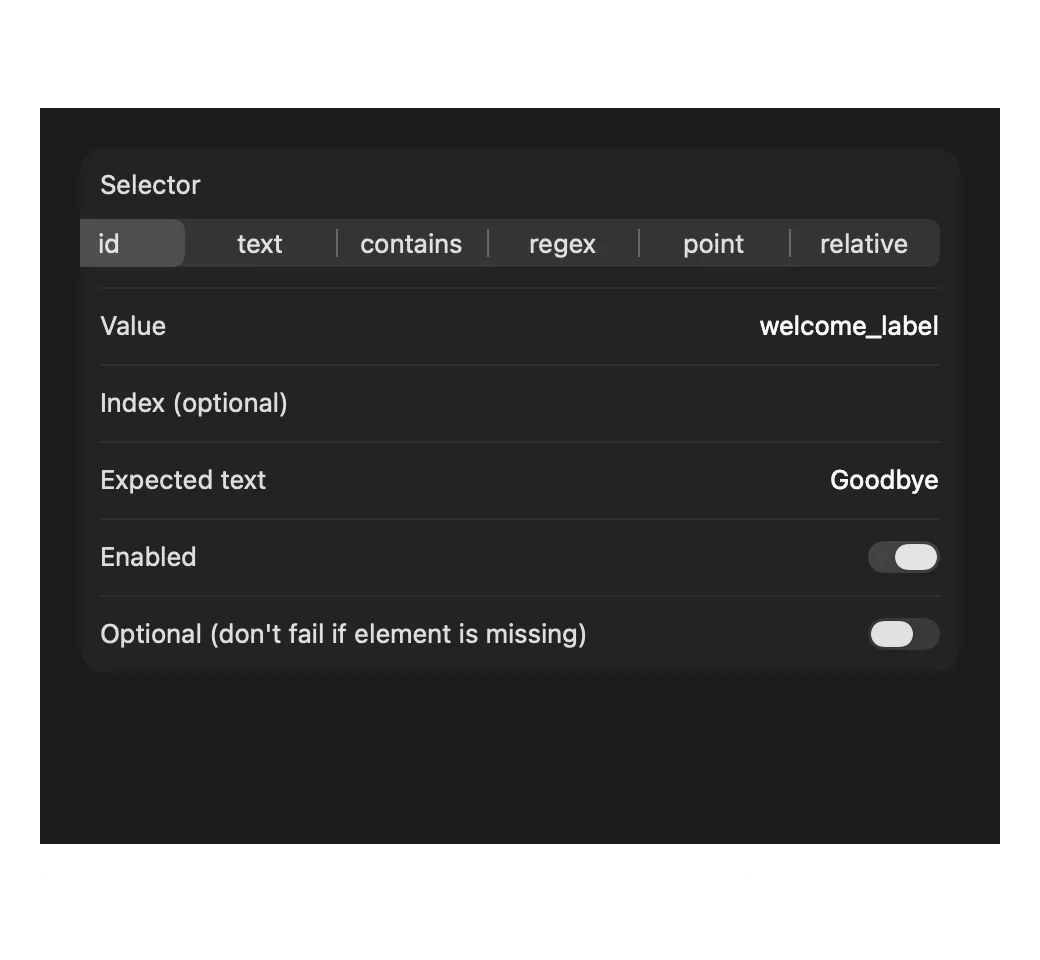
- Pick Element ⇧⌘P → click an element → Visible, Not Visible, Text Equals or Text Exists.
- Maestro matches an element’s whole text. For part of a label (“Good morning,” inside “Good morning, Anna!”) use Text Contains; for several possible texts use Text One Of.
- Flow Control → Only If / Repeat / Retry wraps the selected step, e.g. tap “No” only if the Save password popup shows up.
- Wait is a fixed delay; Wait for animations to end returns as soon as the screen is still.
Thêm kiểm tra và logic
- Pick Element ⇧⌘P → bấm vào phần tử → Visible, Not Visible, Text Equals hoặc Text Exists.
- Maestro so khớp toàn bộ chữ của phần tử. Nếu chỉ là một phần (“Good morning,” trong “Good morning, Anna!”) hãy dùng Text Contains; nhiều khả năng thì dùng Text One Of.
- Flow Control → Only If / Repeat / Retry bọc bước đang chọn, ví dụ chỉ bấm “No” khi popup lưu mật khẩu xuất hiện.
- Wait là chờ cố định; Wait for animations to end chờ tới khi màn hình đứng yên.
Record and run on a real iPhone
- Connect over USB or the same Wi-Fi, unlock, trust the Mac and enable Developer Mode.
- Settings → Project → Apple Team ID → pick your team.
- Select the iPhone under DEVICES. A live view starts in ~15 s: record, pick elements and run as usual.
The first run per Maestro version builds and signs Maestro’s small test driver with your team (~2 min). Remove it any time: Device menu → Remove Test Driver. Not available on real devices (Maestro limits): Clear State, openLink, location and media.
Ghi và chạy trên iPhone thật
- Kết nối qua USB hoặc cùng Wi-Fi, mở khoá, tin cậy máy Mac và bật Developer Mode.
- Settings → Project → Apple Team ID → chọn team của bạn.
- Chọn iPhone trong mục DEVICES. Màn hình trực tiếp hiện sau ~15 giây: ghi, chọn phần tử và chạy như bình thường.
Lần chạy đầu với mỗi phiên bản Maestro, app build và ký test driver nhỏ của Maestro bằng team của bạn (~2 phút). Gỡ bất cứ lúc nào: menu Device → Remove Test Driver. Không dùng được trên máy thật (giới hạn của Maestro): Clear State, openLink, vị trí và media.
Reuse a login flow, chain workflows
- Record the shared part once as its own test, e.g. Login.
- Drag Login from the sidebar into another test’s steps. Editing Login updates every test that uses it; export writes
- runFlow: login.yaml. - Sidebar → Workflows: drag tests onto the board, then Run Workflow. The Run Report shows passed / failed / skipped, timings, screenshots and can be copied as Markdown.
Tái sử dụng flow đăng nhập, nối workflow
- Ghi phần dùng chung thành một test riêng, ví dụ Login.
- Kéo Login từ thanh bên vào danh sách bước của test khác. Sửa Login là mọi test dùng nó đều cập nhật; khi xuất sẽ ra
- runFlow: login.yaml. - Thanh bên → Workflows: kéo các test vào bảng rồi bấm Run Workflow. Run Report hiện số pass / fail / skip, thời gian, ảnh chụp và copy được dạng Markdown.
Test data and run history
Add variables in Settings → Environment, or Import .env file…. While recording, tap a text field: the Fill with bar under the preview lists your variables, best match first. Click one and its value is typed while the step is saved as ${KEY}, so the YAML never holds the secret.
Every run is saved. Test Run → History shows the pass rate of the last 10 runs, a Flaky badge when results flip between pass and fail, and the step that fails most.
Dữ liệu test và lịch sử chạy
Thêm biến ở Settings → Environment, hoặc Import .env file…. Khi đang ghi, chạm vào một ô nhập: thanh Fill with dưới màn hình xem trước liệt kê các biến, khớp nhất đứng đầu. Bấm một biến là giá trị được gõ vào, còn bước được lưu là ${KEY}, nên YAML không bao giờ chứa bí mật.
Mọi lần chạy đều được lưu. Test Run → History hiện tỉ lệ pass của 10 lần gần nhất, nhãn Flaky khi kết quả lúc pass lúc fail, và bước hay lỗi nhất.
Connect an AI provider
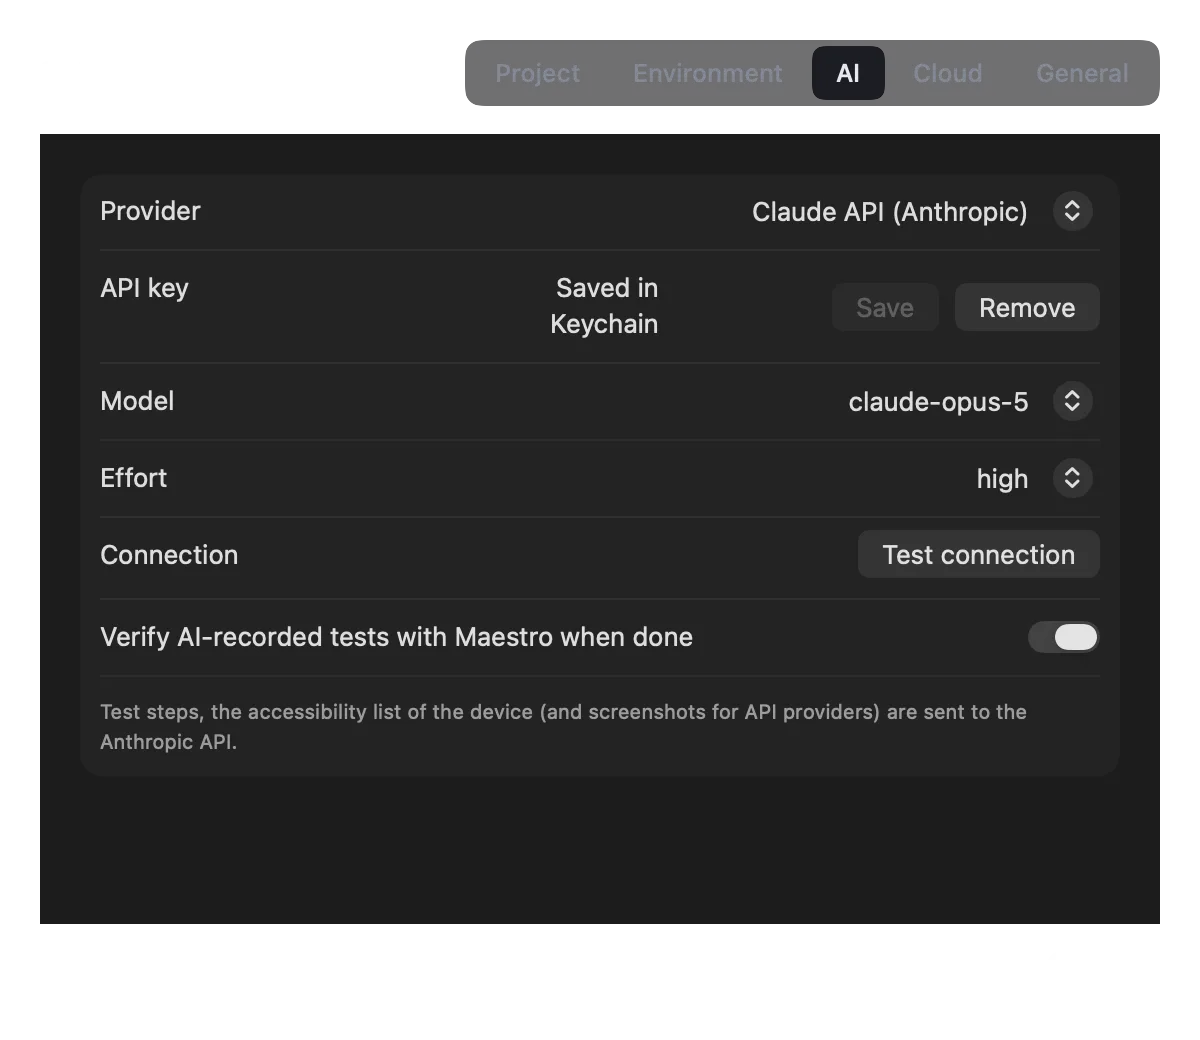
- Open Settings ⌘, → AI and choose a Provider.
- Claude API or OpenAI API: paste your key (
sk-ant-…/sk-…) and press Save. It is stored in the macOS Keychain. Without a saved key the app usesANTHROPIC_API_KEY/OPENAI_API_KEYfrom your environment. - Claude Code, Codex or Command Code: no key. Install the CLI and run it once in Terminal to sign in; the row shows the path it found.
- Press Test connection. For Claude you can also pick the model and how hard it thinks (Effort).
- Leave Verify AI-recorded tests with Maestro when done on: every test the AI records is replayed once before you keep it.
Kết nối nhà cung cấp AI
- Mở Settings ⌘, → AI và chọn Provider.
- Claude API hoặc OpenAI API: dán key (
sk-ant-…/sk-…) rồi bấm Save. Key được lưu trong Keychain của macOS. Nếu chưa lưu key, app dùngANTHROPIC_API_KEY/OPENAI_API_KEYtrong môi trường. - Claude Code, Codex hoặc Command Code: không cần key. Cài CLI rồi chạy nó một lần trong Terminal để đăng nhập; dòng Command hiện đường dẫn app tìm thấy.
- Bấm Test connection. Với Claude bạn chọn thêm model và mức suy nghĩ (Effort).
- Giữ bật Verify AI-recorded tests with Maestro when done: mỗi test AI ghi sẽ được chạy lại một lần trước khi bạn giữ nó.
| Provider | Setup | Prompt → Test |
|---|---|---|
| Claude API | Key from console.anthropic.com | ✓ |
| OpenAI API | Key from platform.openai.com | ✓ |
| Claude Code | npm install -g @anthropic-ai/claude-code, then claude | Improve only |
| Codex | npm install -g @openai/codex, then codex | Improve only |
| Command Code | npm i -g command-code, then command-code | Improve only |
Let the AI pilot write a test
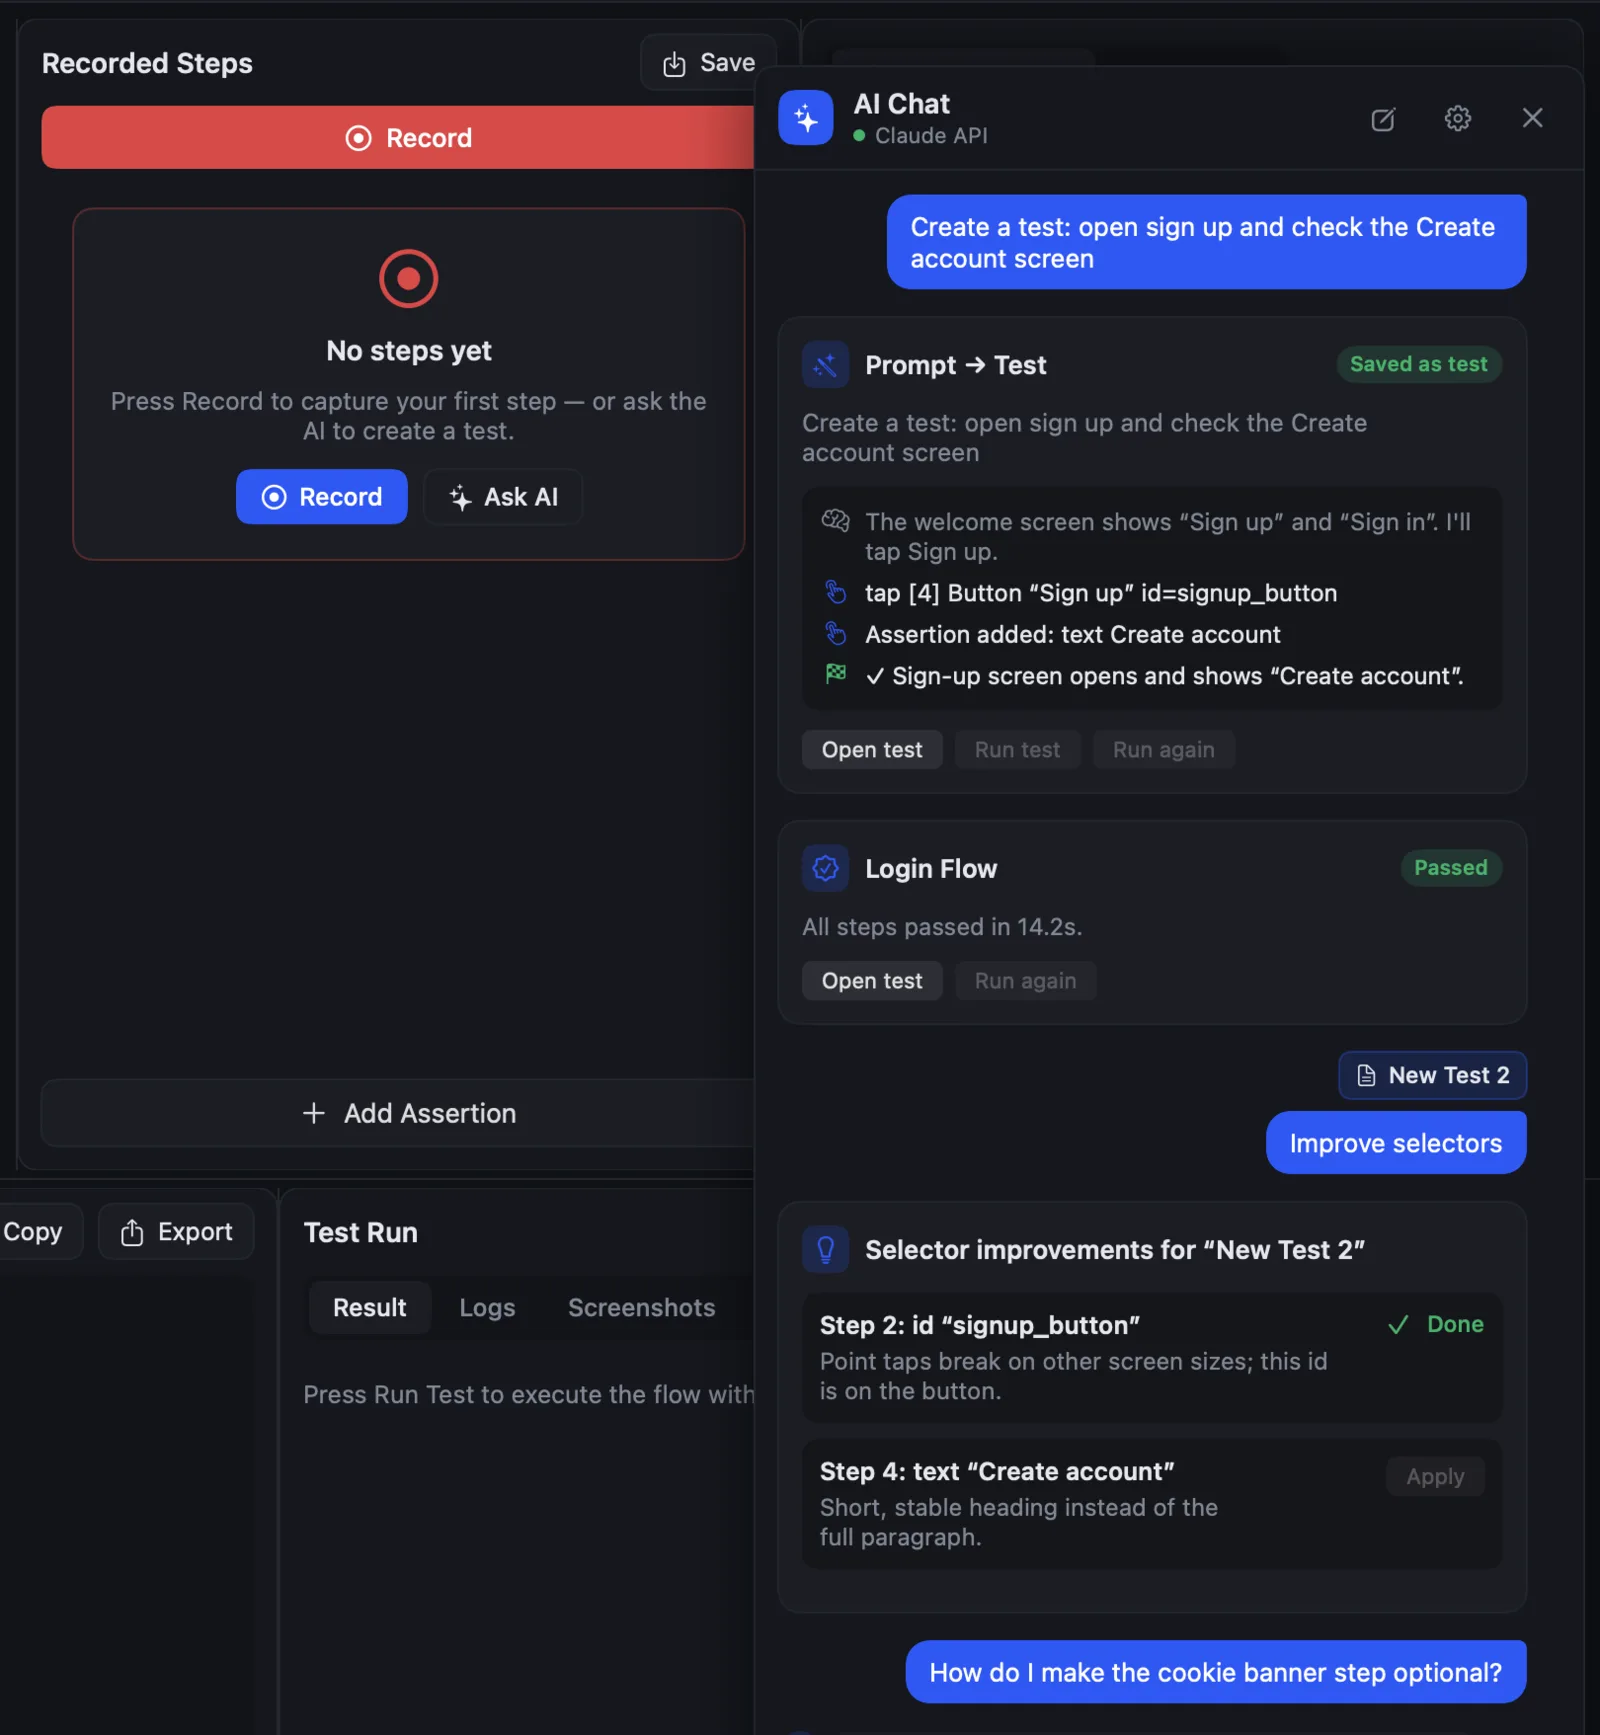
- Open the chat with the ✨ button or ⌘J, with a booted simulator or a live iPhone and your app selected.
- Write what to do: “Create a test: log in with ${EMAIL} and open Settings”. The AI drives the device and records each step live.
- If it gets stuck it pauses with Needs your help: reply with a hint, or do the step yourself and press Continue.
Attach tests or steps to the message to improve selectors, suggest assertions or explain a failure.
Để AI pilot viết test
- Mở chat bằng nút ✨ hoặc ⌘J, khi đã có máy ảo đang chạy hoặc iPhone đang kết nối và đã chọn app.
- Viết việc cần làm: “Create a test: đăng nhập bằng ${EMAIL} rồi mở Settings”. AI tự thao tác trên thiết bị và ghi từng bước trực tiếp.
- Khi bị kẹt, AI dừng lại với nhãn Needs your help: trả lời gợi ý, hoặc tự làm bước đó rồi bấm Continue.
Đính kèm test hoặc các bước vào tin nhắn để cải thiện selector, gợi ý kiểm tra hoặc giải thích lỗi.
Set up a provider first: Connect an AI provider.Cần kết nối nhà cung cấp trước: Kết nối nhà cung cấp AI.
Share with your team, run in CI
- Project → Save Project to Folder (git)… → pick your app repository. Commit
.maestro-recorder/and.maestro/. - Teammates use Open Project from Folder…; changes from
git pullreload automatically. Secret values are never written, only their names. - Export → Export Project to Repository ⇧⌘E writes the YAML plus
.github/workflows/maestro-e2e.yml.
Chia sẻ cho team, chạy trên CI
- Project → Save Project to Folder (git)… → chọn repository của app. Commit
.maestro-recorder/và.maestro/. - Đồng đội dùng Open Project from Folder…; thay đổi từ
git pulltự nạp lại. Giá trị bí mật không bao giờ được ghi ra, chỉ có tên biến. - Export → Export Project to Repository ⇧⌘E ghi YAML kèm
.github/workflows/maestro-e2e.yml.
# run one flow locally or in CI
maestro test .maestro/login-flow.yaml -e PASSWORD="$PASSWORD"
Run on real devices with BrowserStack
- Settings → Cloud: enter your BrowserStack username and access key, then Test connection. The key is stored in the Keychain.
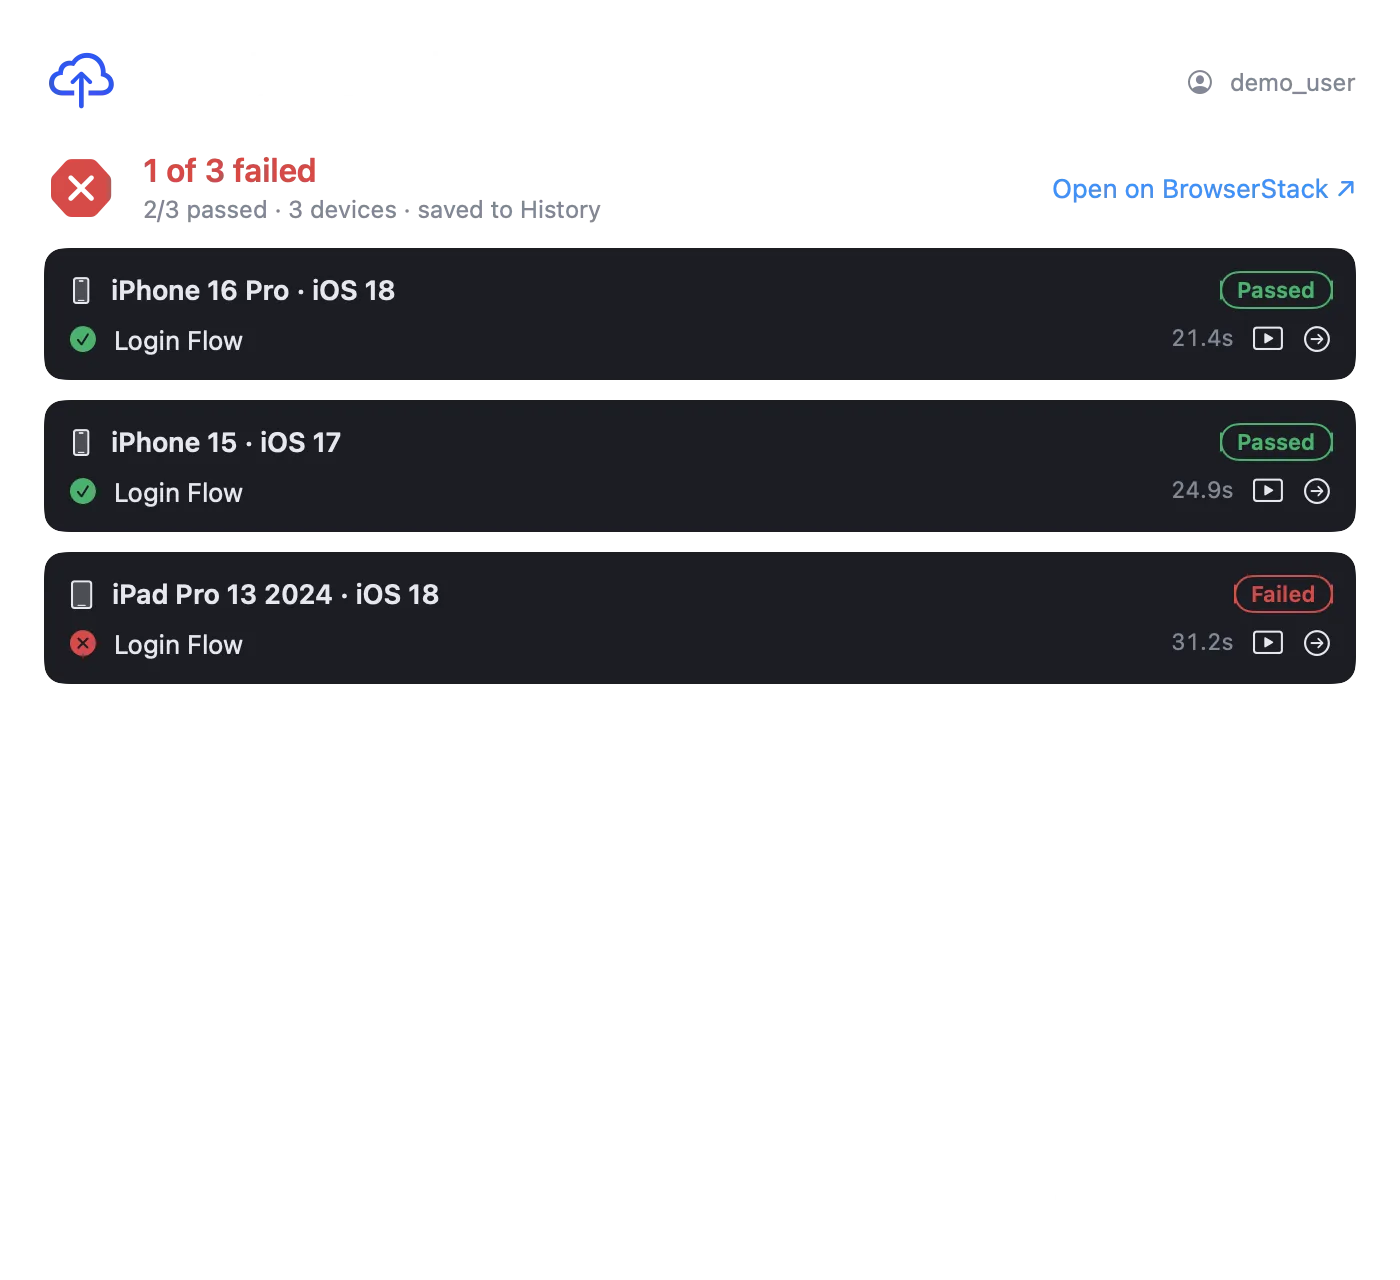
- Press the ☁ button next to Run Test, or ⌥⌘R. On the Workflow board use BrowserStack to run every test of the workflow.
- Choose .ipa…: a device build (Ad Hoc or Development). An unchanged .ipa is uploaded only once.
- Pick one or several iPhones and iPads, then Run. Follow the progress, or close the sheet and keep working.
The report shows every device and test with its error and a ▶ video. Results land in History with a Cloud badge, and the steps of the current test turn ✓ or ✗ like a local run.
Only your .ipa, the test YAML and the variables those tests actually use are sent to BrowserStack. Record locally, run in the cloud.
Chạy trên máy thật với BrowserStack
- Cài đặt → Cloud: nhập username và access key BrowserStack rồi bấm Thử kết nối. Key được lưu trong Keychain.
- Bấm nút ☁ cạnh Run Test, hoặc ⌥⌘R. Trên Workflow board, dùng nút BrowserStack để chạy mọi test của workflow.
- Chọn .ipa…: bản build cho máy thật (Ad Hoc hoặc Development). File .ipa không đổi chỉ tải lên một lần.
- Chọn một hoặc nhiều iPhone, iPad rồi bấm Chạy. Theo dõi tiến trình, hoặc đóng sheet và làm việc khác.
Báo cáo hiện từng thiết bị, từng test kèm lỗi và ▶ video. Kết quả được lưu vào Lịch sử với nhãn Cloud, và các bước của test hiện tại chuyển ✓ hoặc ✗ như khi chạy trên máy.
Chỉ file .ipa, YAML của test và những biến mà test thật sự dùng được gửi lên BrowserStack. Ghi test trên máy, chạy trên cloud.
Shortcuts & quick fixes
Phím tắt & xử lý nhanh
| ⇧⌘R | Record / Stop | ⌘R | Run |
| ⇧⌘P | Pick Element | ⌘. | Stop run |
| ⌘J | AI chat | ⌘E | Export flow |
| ⌘O | Import YAML | ⇧⌘E | Export project |
- Device shows “Not connected”: check the cable, unlock the phone, trust the Mac, enable Developer Mode.
- hideKeyboard fails: use Press Enter instead.
- Driver build failed on the iPhone: open the log path in the error; it’s usually signing or the team.
- Thiết bị báo “Not connected”: kiểm tra cáp, mở khoá điện thoại, tin cậy máy Mac, bật Developer Mode.
- hideKeyboard bị lỗi: dùng Press Enter thay thế.
- Build driver trên iPhone lỗi: mở đường dẫn log trong thông báo; thường là do ký app hoặc team.